
2022-10-19 422
这次给大家带来H5实现旋转立体魔方,H5实现旋转立体魔方的注意事项有哪些,下面就是实战案例,一起来看一下。
下面是预览画面。
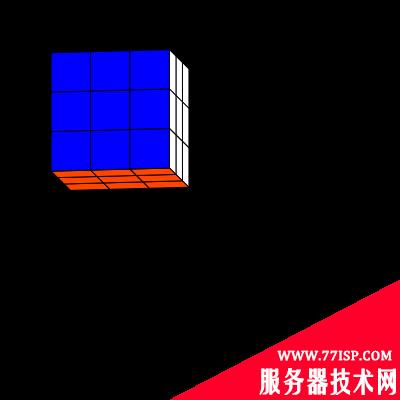
制作流程
首先你需要下载Html5开源库件lufylegend-1.4.0
魔方分为6个面,每个面由9个小矩形组成,现在我把每个小矩形当做一个类封装起来,
因为现在建立的是一个3D魔方,所以要画出每个小矩形,需要知道小矩形的4个定点,而这4个定点会根据空间的旋转角度而变换,所以为了计算出这4个定点坐标,需要知道魔方绕x轴和z轴旋转的角度。
所以,建立矩形类如下
function Rect(pointA,pointB,pointC,pointD,angleX,angleZ,color){
    base(this,LSprite,[]);
    this.pointZ=[(pointA[0]+pointB[0]+pointC[0]+pointD[0])/4,(pointA[1]+pointB[1]+pointC[1]+pointD[1])/4,(pointA[2]+pointB[2]+pointC[2]+pointD[2])/4];
    this.z = this.pointZ[2];
    this.pointA=pointA,this.pointB=pointB,this.pointC=pointC,this.pointD=pointD,this.angleX=angleX,this.angleZ=angleZ,this.color=color;
}

Rect.prototype.setAngle = function(a,b){
    this.angleX = a;
    this.angleZ = b;
    this.z=this.getPoint(this.pointZ)[2];
};
pointA,pointB,pointC,pointD是小矩形的四个顶点,angleX,angleZ分别是x轴和z轴旋转的角度,color是小矩形的颜色。
魔方分为6个面,先看一下最前面的一面,如果以立方体的中心作为3D坐标系的中心,那么9个小矩形的各个定点所对应的坐标如下图所示
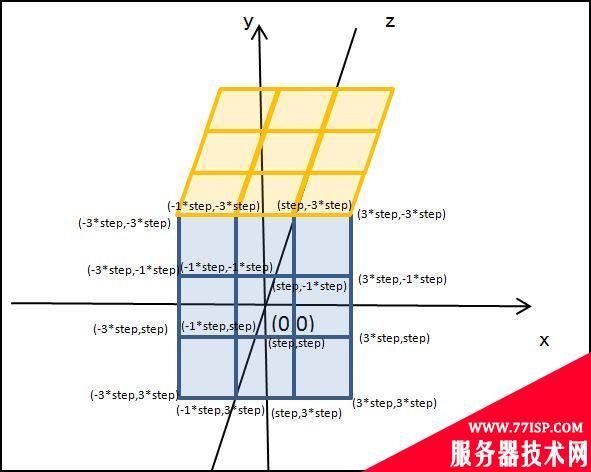
所以,前面这个面的9个小矩形可以由下面的代码来建立
for(var x=0;x
其中backLayer是一个LSprite类,step是半个小矩形的长,同样的道理,可以也得到其他5个面。
6个面都建立了,在绘制这6个面之前,首先要根据旋转的角度来计算各个定点的坐标,看下面的图

根据上面的图,用下面的公式即可得到变换后的定点坐标
Rect.prototype.getPoint = function(p){
    var u2,v2,w2,u=p[0],v=p[1],w=p[2];
    u2 = u * Math.cos(this.angleX) - v * Math.sin(this.angleX);
    v2 = u * Math.sin(this.angleX) + v * Math.cos(this.angleX);
    w2 = w;
    u = u2; v = v2; w = w2;
    u2 = u;
    v2 = v * Math.cos(this.angleZ) - w * Math.sin(this.angleZ);
    w2 = v * Math.sin(this.angleZ) + w * Math.cos(this.angleZ);
    u = u2; v = v2; w = w2;
    return [u2,v2,w2];
};
最后根据小矩形的四个定点坐标,来绘制这个矩形,
Rect.prototype.draw = function(layer){
    this.graphics.clear();
    this.graphics.drawVertices(1,"#000000",[this.getPoint(this.pointA),this.getPoint(this.pointB),this.getPoint(this.pointC),this.getPoint(this.pointD)],true,this.color);
};
其中drawVertices是lufylegend.js库件中LGraphics类的一个方法,它可以根据传入的定点坐标数组来绘制一个多边形。
最后,给出完整代码,代码很少,JS代码一共91行。
一,index.html
3D魔方


loading……
二,Rect类
function Rect(pointA,pointB,pointC,pointD,angleX,angleZ,color){
    base(this,LSprite,[]);
    this.pointZ=[(pointA[0]+pointB[0]+pointC[0]+pointD[0])/4,(pointA[1]+pointB[1]+pointC[1]+pointD[1])/4,(pointA[2]+pointB[2]+pointC[2]+pointD[2])/4];
    this.z = this.pointZ[2];
    this.pointA=pointA,this.pointB=pointB,this.pointC=pointC,this.pointD=pointD,this.angleX=angleX,this.angleZ=angleZ,this.color=color;
}
Rect.prototype.draw = function(layer){
    this.graphics.clear();
    this.graphics.drawVertices(1,"#000000",[this.getPoint(this.pointA),this.getPoint(this.pointB),this.getPoint(this.pointC),this.getPoint(this.pointD)],true,this.color);
};
Rect.prototype.setAngle = function(a,b){
    this.angleX = a;
    this.angleZ = b;
    this.z=this.getPoint(this.pointZ)[2];
};
Rect.prototype.getPoint = function(p){
    var u2,v2,w2,u=p[0],v=p[1],w=p[2];
    u2 = u * Math.cos(this.angleX) - v * Math.sin(this.angleX);
    v2 = u * Math.sin(this.angleX) + v * Math.cos(this.angleX);
    w2 = w;
    u = u2; v = v2; w = w2;
    u2 = u;
    v2 = v * Math.cos(this.angleZ) - w * Math.sin(this.angleZ);
    w2 = v * Math.sin(this.angleZ) + w * Math.cos(this.angleZ);
    u = u2; v = v2; w = w2;
    return [u2,v2,w2];
};
三,Main.js
init(50,"mylegend",400,400,main);
var a = 0,b=0,backLayer,step = 20,key = null;
function main(){
    backLayer = new LSprite();
    addChild(backLayer);
    backLayer.x = 120,backLayer.y = 120;
    //后
    for(var x=0;x
以上就是“H5实现旋转立体魔方 俄罗斯方块怎么实现旋转”的详细内容,更多请关注77isp云服务器技术网其它相关文章!
原文链接:https://77isp.com/post/3098.html
=========================================
https://77isp.com/ 为 “云服务器技术网” 唯一官方服务平台,请勿相信其他任何渠道。
数据库技术 2022-03-28
网站技术 2022-11-26
网站技术 2023-01-07
网站技术 2022-11-17
Windows相关 2022-02-23
网站技术 2023-01-14
Windows相关 2022-02-16
Windows相关 2022-02-16
Linux相关 2022-02-27
数据库技术 2022-02-20
抠敌 2023年10月23日
嚼餐 2023年10月23日
男忌 2023年10月22日
瓮仆 2023年10月22日
簿偌 2023年10月22日
扫码二维码
获取最新动态
