
2022-10-24 493
这篇文章主要介绍了canvas实现图片马赛克的示例代码的相关资料,内容挺不错的,现在分享给大家,也给大家做个参考。
1. 原生canvas实现用到的API
1) getContext(contextID) —返回一个用于在画布上绘图的环境
Canvas.getContext('2d') // 返回一个 CanvasRenderingContext2D 对象,使用它可以绘制到 Canvas 元素中
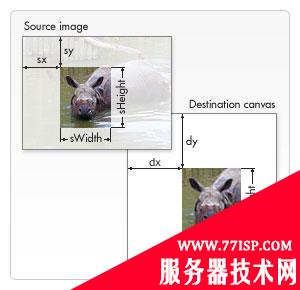
2)drawImage
drawImage(imgObj, x, y)  // 按原图大小绘制, x、y为图片在画布中的位置坐标
drawImage(imgObj, x, y, width, height) // 按指定宽高绘制
drawImage(imgObj, sourceX, sourceY, sourceWidth, sourceHeight, destX, destY, destWidth, destHeight) // 从原来图片上某一个位置开始(sourceX,sourceY),指定长宽进行剪切(sourceWidth,sourceHeight),然后将剪切的内容放到位置为(destX,destY),宽度为(destWidth),高度为(destHeight)的位置上
3) getImageData(x, y, width, height) —获取矩形区域的图像信息
ctx.getImageData(0, 0, 10, 10) // 获取左上角坐标为(0, 0),宽高为区域内的图像信息
// 返回ImageData: { width: 10, height: 10, data: Uint8ClampedArray[400] }
4)beginPath() —开始一条路径,或重置当前的路径 5)rect(x, y, width, height) —绘制矩形
6)lineWidth —设置或返回当前线条的宽度
7)fillStyle —设置或返回用于填充绘画的颜色、渐变或模式
ctx.fillStyle = color|gradient|pattern
8)strokeStyle —设置或返回用于笔触的颜色、渐变或模式
9)globalAlpha —设置或返回绘图的当前透明值
10)fill() —填充当前的图像(路径)。默认颜色是黑色
【注】如果路径未关闭,那么 fill() 方法会从路径结束点到开始点之间添加一条线,以关闭该路径,然后填充该路径。
11)stroke() —会实际地绘制出通过 moveTo() 和 lineTo() 方法定义的路径。默认颜色是黑色
12)toDataURL(type, encoderOptions) —导出图片,type为图片类型, encoderOptions图片质量,[0, 1]
Canvas.toDataURL("image/png", 1)
2. fabric.js
简化canvas编写的库,为canvas提供所缺少的对象模型
fabric.js能做的事
1)在canvas上创建、填充图形(包括图片、文字、规则图形和复杂路径组成图形)
2)给图形填充渐变颜色
3)组合图形(包括组合图形、图形文字、图片等)
4)设置图形动画集用户交互
5)生成JSON, SVG数据等
3.使用fabric.js实现用到的API
1)声明画布
let canvas =new fabric.Canvas('canvas') {
   width: 200,
   height: 200
}
插入图片
let imgInstance = new fabric.Image(imgElement,{
  left: 0,
  top: 0,
  width: 100,
  height: 100,
  angle: 0
}
3)设置背景图片 setBackgroundImage
canvas.setBackgroundImage(imgInstance)
4)renderAll() 重新绘制
5)on() 用户交互
canvas.on('mouse:down', function(options) {
   console.log(options.e.clientX, options.e.clientY)
})

// 监听事件
/*
   mouse:down :鼠标按下时
   mouse:move :鼠标移动时
   mouse:up :鼠标抬起时
   after:render :画布重绘后
   object:selected:对象被选中
   object:moving:对象移动
   object:rotating:对象被旋转
   object:added:对象被加入
   object:removed对象被移除
*/
6)getPointer()
7)setWidth()、setHeight() 设置canvas的宽高
8)画矩形
let rect = new fabric.Rect({
 left: 0,
 top: 0,
 width: 100,
 height: 100
})
add(obj) 添加图形
canvas.add(rect)
10)remove(obj) 移除图形
11)set() 设置对象内容
12)toDataURL(obj)
4.原生canvas实现代码
export default {
data () {
return {
context: ”,
canvas: ”,
isMasic: false,
isText: false,
isTailor: false,
isTranslate: false,
squareEdgeLength: 20,
angle: 0,
img: ”
}
},
mounted () {
this.initData()
},
methods: {
initData () {
let imgContent = this.$refs.imgContent
this.canvas = imgContent
this.context = imgContent.getContext(‘2d’)
let Img = new Image()
this.image = Img
Img.crossOrigin = “Anonymous”
Img.src = ‘http://oia85104s.bkt.clouddn.com/PictureUnlock_193139.pictureunlock.jpg’
this.canvas.setAttribute(‘width’, Img.width)
this.canvas.setAttribute(‘height’, Img.height)
let self = this
Img.onload = () => {
let beginX, beginY, endX, endY
self.context.drawImage(Img, 0, 0)
self.context.save()
self.canvas.addEventListener(‘mousedown’, e => {
beginX = e.offsetX
beginY = e.offsetY
self.canvas.addEventListener(‘mouseup’, e => {
endX = e.offsetX
endY = e.offsetY
if (self.isMasic) {
self.makeGrid(beginX, beginY, endX – beginX, endY – beginY)
return
}
if (self.isTailor) {
self.context.drawImage(Img, beginX, beginY, endX – beginX, endY – beginY, 0, 0, endX – beginX, endY – beginY)
return
}
})
})
}
},
drawRect (x, y, width, height, fillStyle, lineWidth, strokeStyle, globalAlpha) {
this.context.beginPath()
this.context.rect(x, y, width, height)
this.context.lineWidth = lineWidth
this.context.strokeStyle = strokeStyle
fillStyle && (this.context.fillStyle = fillStyle)
globalAlpha && (this.context.globalAlpha = globalAlpha)
this.context.fill()
this.context.stroke()
},
// 打马赛克
mosaic () {
let self = this
this.resetClickStatus()
this.isMasic = true
},
makeGrid (beginX, beginY, rectWidth, rectHight) {
const row = Math.round(rectWidth / this.squareEdgeLength) + 1
const column = Math.round(rectHight / this.squareEdgeLength) + 1
for (let i = 0; i < row * column; i++) {
let x = (i % row) * this.squareEdgeLength + beginX
let y = parseInt(i / row) * this.squareEdgeLength + beginY
this.setColor(x, y)
}
},
setColor (x, y) {
const imgData = this.context.getImageData(x, y, this.squareEdgeLength, this.squareEdgeLength).data
let r = 0, g = 0, b = 0
console.log(this.context.getImageData(x, y, this.squareEdgeLength, this.squareEdgeLength), JSON.stringify(imgData))
for (let i = 0; i < imgData.length; i += 4) {
r += imgData[i]
g += imgData[i + 1]
b += imgData[i + 2]
}
r = Math.round(r / (imgData.length / 4))
g = Math.round(g / (imgData.length / 4))
b = Math.round(b / (imgData.length / 4))
this.drawRect(x, y, this.squareEdgeLength, this.squareEdgeLength, `rgb(${r}, ${g}, ${b})`, 2, `rgb(${r}, ${g}, ${b})`)
},
// 添加文字
addText () {
this.resetClickStatus()
this.isText = true
console.log('添加文字')
},
// 裁剪
tailor () {
this.resetClickStatus()
this.isTailor = true
console.log('裁剪')
} ,
// 旋转
rotate () {
// if (this.angle === 360) {
// this.angle = 90
// } else {
// this.angle += 90
// }
// if ([90, 270].includes(this.angle)) {
// this.canvas.setAttribute('width', this.image.height)
// this.canvas.setAttribute('height', this.image.width)
// } else {
// this.canvas.setAttribute('width', this.image.width)
// this.canvas.setAttribute('height', this.image.height)
// }
const x = this.image.width / 2
const y = this.image.height / 2
this.context.clearRect(0,0, this.canvas.width, this.canvas.height) // 清理画布内容
this.context.translate(x, y)
this.context.rotate(90 * Math.PI / 180)
this.context.translate(-x, -y)
this.context.drawImage(this.image, 0, 0)
},
resetClickStatus () {
this.isMasic = false
this.isText = false
this.isTailor = false
this.isTranslate = false
},
exportImg () {
this.resetClickStatus()
const exportUrl = this.canvas.toDataURL("image/jpeg")
let a = document.createElement('a')
a.setAttribute('download', '')
a.href = exportUrl
document.body.appendChild(a)
a.click()
}
}
}
.operations {
width: 1200px;
margin: 0 auto;
ul {
display: flex;
align-items: center;
margin-bottom: 30px;
li {
list-style: none;
margin-right: 20px;
cursor: pointer;
}
}
}
.img-wrap {
display: block;
margin: 0 auto;
}
以上就是“如何使用canvas实现图片马赛克 使用canvas显示的图片有马赛克”的详细内容,更多请关注77isp云服务器技术网其它相关文章!
原文链接:https://77isp.com/post/3940.html
=========================================
https://77isp.com/ 为 “云服务器技术网” 唯一官方服务平台,请勿相信其他任何渠道。
数据库技术 2022-03-28
网站技术 2022-11-26
网站技术 2023-01-07
网站技术 2022-11-17
Windows相关 2022-02-23
网站技术 2023-01-14
Windows相关 2022-02-16
Windows相关 2022-02-16
Linux相关 2022-02-27
数据库技术 2022-02-20
抠敌 2023年10月23日
嚼餐 2023年10月23日
男忌 2023年10月22日
瓮仆 2023年10月22日
簿偌 2023年10月22日
扫码二维码
获取最新动态
