
2022-10-23 377
继上一篇文章“分析工具Awstats实战之Nginx篇-分析结果静态化”后,作者推出了这个系列的第二篇:日志分析工具Awstats实战之Nginx篇:分析结果动态化,介绍了如何将awstats的日志分析信息用静态页面来进行显示,不过显示效果肯定没有动态的好,本篇文章将带大家一起来部署动态的分析结果查阅。
环境:
CentOS6.4
ip:192.168.1.113
域名:www.sunsky.com(server和client都通过hosts文件解析)
nginx-1.2.9编译安装,路径/usr/local/nginx,服务开启状态
日志记录格式为nginx默认的,切勿更改,否则会造成awstats无法分析日志。
log_formatmain'$remote_addr-$remote_user[$time_local]"$request"'
'$status$body_bytes_sent"$http_referer"'
'"$http_user_agent""$http_x_forwarded_for"';
awstats-7.2.tar.gzCPAN-2.00.tar.gzFCGI-0.74.tar.gzFCGI-ProcManager-0.24.tar.gz
必须有perl-devel,不然无法编译FCGI。
一、日志自动切割
对于nginx的日志切割,由于没有像apache一样去用cronolog工具,这里我们就写一个脚本,让它可以在每天00:01自动执行,切割昨天的日志(交由awstats分析),压缩前天的日志(压缩日志可减小存储空间,为防止awstats没有分析完就被压缩,所以只压缩前天的日志)。
vim/server/scripts/cut_nginx_log.sh
输入以下内容:
#!/bin/sh
yesterday=`date-d"yesterday"+"%Y%m%d"`
before_yesterday=`date-d"-2day"+"%Y%m%d"`
Nginx_Dir="/usr/local/nginx"
Nginx_logs="/app/logs"
Log_Name="www_access"
cd/tmp
[-d$Nginx_Logs]&&cd$Nginx_logs||exit1
[-f$Log_Name.log]&&/bin/mv$Log_Name.log${Log_Name}_${yesterday}.log||exit1
if[$?-eq0-a-f$Nginx_Dir/logs/nginx.pid]
then
kill-USR1`cat$Nginx_Dir/logs/nginx.pid`
fi
[-f${Log_Name}_${before_yesterday}.log]&&/usr/bin/gzip${Log_Name}_${before_yesterday}.log||exit1
执行crontab -e将该脚本加入定时任务中
10***/bin/sh/server/scripts/cut_nginx_log.sh>/dev/null2>&1
这样每天凌晨00:01就能自动实现日志的切割,压缩等功能了。
因为本次实验下的nginx此时已经有日志了,另外为了后文awstats能对切割过的日志进行分析,所以这里我们要运行一下此脚本,来将现有日志进行切割生成昨天的日志方便后文操作。
/bin/sh/server/scripts/cut_nginx_log.sh>/dev/null2>&1
#p#
二、配置FCGI
1、安装CPAN
wgethttp://search.cpan.org/CPAN/authors/id/A/AN/ANDK/CPAN-2.00.tar.gz
tarzxfCPAN-2.00.tar.gz
cdCPAN-2.00
perlMakefile.PL
make&&makeinstall
2、安装FCGI和FCGI::ProcManager
wgethttp://search.cpan.org/CPAN/authors/id/F/FL/FLORA/FCGI-0.74.tar.gz
tarzxfFCGI-0.74.tar.gz
cdFCGI-0.74
第一种安装方法:perl-MCPAN-e'installFCGI'
第二种安装方法:perlMakefile.PL
make&&makeinstall
wgethttp://search.cpan.org/CPAN/authors/id/B/BO/BOBTFISH/FCGI-ProcManager-0.24.tar.gz
tarzxfFCGI-ProcManager-0.24.tar.gz
cdFCGI-ProcManager-0.24
第一种安装方法:perl-MCPAN-e'installFCGI::ProcManager'
第二种安装方法:perlMakefile.PL
make&&makeinstall
在执行第一种安装方法的时候,一定是全程自动滚动下来提示OK的。如果出现提示你输入yes之类的,你需要按提示操作完之后,再运行第二次直到全程自动滚动下来提示OK才为完成安装。或者你就用第二种方法来执行安装。
3、创建FCGI启动文件
vi/usr/local/nginx/sbin/fcgi#此处按个人习惯命名
#!/usr/bin/perl
useFCGI;
#perl-MCPAN-e'installFCGI'
useSocket;
usePOSIXqw(setsid);
#useFcntl;
require'syscall.ph';
&daemonize;
#thiskeepstheprogramaliveorsomethingafterexec'ingperlscripts
END(){}BEGIN(){}
*CORE::GLOBAL::exit=sub{die"fakeexit\nrc=".shift()."\n";};
evalq{exit};
if($@){
exitunless$@=~/^fakeexit/;
};
&main;
subdaemonize(){
chdir'/'ordie"Can'tchdirto/:$!";
defined(my$pid=fork)ordie"Can'tfork:$!";
exitif$pid;
setsidordie"Can'tstartanewsession:$!";
umask0;
}
submain{
#$socket=FCGI::OpenSocket("127.0.0.1:8999",10);
$socket=FCGI::OpenSocket("/usr/local/nginx/fastcgi_temp/perl_cgi-dispatch.sock",10);
#useUNIXsockets-userrunningthisscriptmusthavewaccesstothe'nginx'folder!!
$request=FCGI::Request(\*STDIN,\*STDOUT,\*STDERR,\%req_params,$socket);
if($request){request_loop()};
FCGI::CloseSocket($socket);
}
subrequest_loop{
while($request->Accept()>=0){
#processinganySTDINinputfromWebServer(forCGI-POSTactions)
$stdin_passthrough='';
$req_len=0+$req_params{'CONTENT_LENGTH'};
if(($req_params{'REQUEST_METHOD'}eq'POST')&&($req_len!=0)){
my$bytes_read=0;
while($bytes_read<$req_len){
my$data='';
my$bytes=read(STDIN,$data,($req_len-$bytes_read));
lastif($bytes==0||!defined($bytes));
$stdin_passthrough.=$data;
$bytes_read+=$bytes;
}
}
#runningthecgiapp
if((-x$req_params{SCRIPT_FILENAME})&&#canIexecutethis?
(-s$req_params{SCRIPT_FILENAME})&&#Isthisfileempty?
(-r$req_params{SCRIPT_FILENAME})#canIreadthisfile?
){
pipe(CHILD_RD,PARENT_WR);
my$pid=open(KID_TO_READ,"-|");
unless(defined($pid)){
print("Content-type:text/plain\r\n\r\n");
print"Error:CGIappreturnednooutput-Executing$req_params
{SCRIPT_FILENAME}failed!\n";
next;
}
if($pid>0){
close(CHILD_RD);
printPARENT_WR$stdin_passthrough;
close(PARENT_WR);
while(my$s=<KID_TO_READ>){print$s;}
closeKID_TO_READ;
waitpid($pid,0);
}else{
foreach$key(keys%req_params){
$ENV{$key}=$req_params{$key};
}
#cdtothescript'slocaldirectory
if($req_params{SCRIPT_FILENAME}=~/^(.*)\/[^\/]+$/){
chdir$1;
}
close(PARENT_WR);
close(STDIN);
#fcntl(CHILD_RD,F_DUPFD,0);
syscall(&SYS_dup2,fileno(CHILD_RD),0);
#open(STDIN,"<&CHILD_RD");
exec($req_params{SCRIPT_FILENAME});
die("execfailed");
}
}
else{
print("Content-type:text/plain\r\n\r\n");
print"Error:NosuchCGIapp-$req_params{SCRIPT_FILENAME}maynotexistoris
notexecutablebythisprocess.\n";
}
}
}
创建完成后,需要赋予fcgi执行权限:
chmod755/usr/local/nginx/sbin/fcgi
启动FPM(FastCGI 进程管理器)
perl/usr/local/nginx/sbin/fcgi>/dev/null2>$1
在这里,Nginx需要对fcgi生成的/usr/local/nginx/fastcgi_temp/perl_cgi-dispatch.sock有读写权限,否则会报502错误。
#p#
三、Awstats的安装与配置
1、部署awstats
首先我们要下载awstats软件包,并将其放在常规目录(/usr/local)下:
wgethttp://awstats.sourceforge.net/files/awstats-7.2.tar.gz
tarzxfawstats-7.2.tar.gz
mvawstats-7.2/usr/local/awstats
由于wget下载下来的包中权限是非root的,所以这里要修改权限,否则稍后*.pl将无法运行:
chown-Rroot.root/usr/local/awstats
chmod+x/usr/local/awstats/tools/*.pl
chmod+x/usr/local/awstats/wwwroot/cgi-bin/*.pl
接下来我们要执行awstats/tools下的awstats_configure.pl配置向导,用来生成awstats的配置文件,awstats配置文件的命名规则是awstats.website.conf
cd/usr/local/awstats/tools/
./awstats_configure.pl
此时会出现如下提示:
-----AWStatsawstats_configure1.0(build1.9)(c)LaurentDestailleur-----
ThistoolwillhelpyoutoconfigureAWStatstoanalyzestatisticsfor
onewebserver.Youcantrytouseittoletitdoallthatispossible
inAWStatssetup,howeverfollowingthestepbystepmanualsetup
documentation(docs/index.html)isoftenabetteridea.Aboveallif:
-Youarenotanadministratoruser,
-Youwanttoanalyzedownloadedlogfileswithoutwebserver,
-Youwanttoanalyzemailorftplogfilesinsteadofweblogfiles,
-Youneedtoanalyzeloadbalancedserverslogfiles,
-Youwantto'understand'allpossiblewaystouseAWStats...
ReadtheAWStatsdocumentation(docs/index.html).
----->RunningOSdetected:Linux,BSDorUnix
----->Checkforwebserverinstall
EnterfullconfigfilepathofyourWebserver.
Example:/etc/httpd/httpd.conf
Example:/usr/local/apache2/conf/httpd.conf
Example:c:\Programfiles\apachegroup\apache\conf\httpd.conf
Configfilepath('none'toskipwebserversetup):
>none#这里让填写网页服务器的配置文件路径,因为我们用的不是apache,所以这里要填none
Yourwebserverconfigfile(s)couldnotbefound.
YouwillneedtosetupyourwebservermanuallytodeclareAWStats
scriptasaCGI,ifyouwanttobuildreportsdynamically.
SeeAWStatssetupdocumentation(filedocs/index.html)
----->Updatemodelconfigfile'/usr/local/awstats/wwwroot/cgi-bin/awstats.model.conf'
Fileawstats.model.confupdated.
----->Needtocreateanewconfigfile?
DoyouwantmetobuildanewAWStatsconfig/profile
file(requirediffirstinstall)[y/N]?y#询问是否创建一个新的配置文件,这里填y
----->Defineconfigfilenametocreate
Whatisthenameofyourwebsiteorprofileanalysis?
Example:www.mysite.com
Example:demo
Yourwebsite,virtualserverorprofilename:
>www.sunsky.com#这里让填写你的网站域名,虚拟主机名或者随便一个配置名
----->Defineconfigfilepath
Inwhichdirectorydoyouplantostoreyourconfigfile(s)?
Default:/etc/awstats
Directorypathtostoreconfigfile(s)(Enterfordefault):
>#这里要填写你配置文件存放路径,我们使用它默认的路径/etc/awstats,所以直接回车即可
----->Createconfigfile'/etc/awstats/awstats.www.sunsky.com.conf'
Configfile/etc/awstats/awstats.www.sunsky.com.confcreated.
----->Addupdateprocessinsideascheduler
Sorry,configure.pldoesnotsupportautomaticaddtocronyet.
Youcandoitmanuallybyaddingthefollowingcommandtoyourcron:
/usr/local/awstats/wwwroot/cgi-bin/awstats.pl-update-config=www.sunsky.com
Orifyouhaveseveralconfigfilesandpreferhavingonlyonecommand:
/usr/local/awstats/tools/awstats_updateall.plnow
PressENTERtocontinue...#提示不能自动加入crontab定时任务,需要稍后自己添加,我们按回车继续即可
ASIMPLEconfigfilehasbeencreated:/etc/awstats/awstats.www.sunsky.com.conf
Youshouldhavealookinsidetocheckandchangemanuallymainparameters.
Youcanthenmanuallyupdateyourstatisticsfor'www.sunsky.com'withcommand:
>perlawstats.pl-update-config=www.sunsky.com
Youcanalsobuildstaticreportpagesfor'www.sunsky.com'withcommand:
>perlawstats.pl-output=pagetype-config=www.sunsky.com
PressENTERtofinish...#提示配置文件创建完成和如何更新配置及建立静态报告页,这里我们回车即可结束这个配置向导
2、修改awstats配置文件
完成配置文件的创建之后,我们还需要对/etc/awstats/awstats.www.sunsky.com.conf里的一些参数进行修改。
sed-i's#LogFile="/var/log/httpd/mylog.log"#LogFile="/app/logs/www_access_%YYYY-24%MM-24%DD-24.log"#g'/etc/awstats/awstats.www.sunsky.com.conf
这里更改的目的是指定awstats需要分析的nginx的日志文件路径。这里的路径大家要按自己的日志路径来填。
sed-i's#DirData="/var/lib/awstats"#DirData="/usr/local/awstats/data"#g'/etc/awstats/awstats.www.sunsky.com.conf
这里更改的目的是指定awstats的数据库配置文件(即awstats的数据库(纯文本))。
由于,此处没有/usr/local/awstats/data目录,所以我们要创建出来:
mkdir/usr/local/awstats/data
以上的两个替换操作进行完之后一定要用命令查看替换是否成功,以便及早发现纰漏。
grep"LogFile="/etc/awstats/awstats.www.sunsky.com.conf
grep"DirData="/etc/awstats/awstats.www.sunsky.com.conf
查询替换结果正确之后,即可进行下面的步骤。
3、生成awstats统计信息数据库
现在我们需要用awstats来生成对日志的统计分析信息出来了。由于我们用的是支持perl的FCGI动态化访问页面,所以此处我们只需要直接更新数据库即可。FCGI程序会自动将数据库以动态页面的形式展现出来,无须再手动生成静态页面了。本处我们用脚本来完成。
vim/server/scripts/awstats_up.sh
#!/bin/sh
/usr/local/awstats/wwwroot/cgi-bin/awstats.pl-update-config=www.sunsky.com>/dev/null2>&1
该脚本里面用下面的命令也是可以的。
/usr/local/awstats/tools/awstats_updateall.plnow
运行该脚本生成分析结果
/bin/sh/server/scripts/awstats_up.sh
#p#
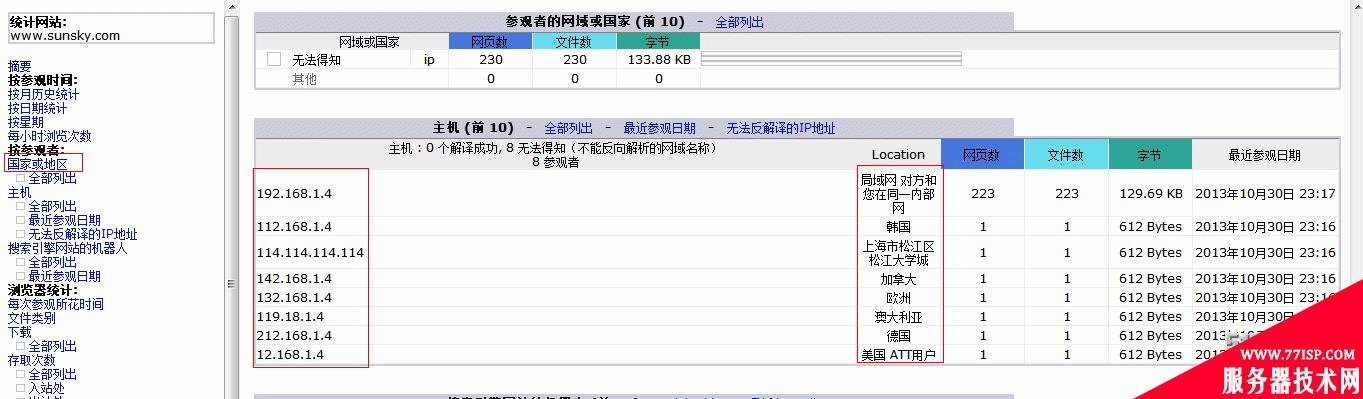
四、配置日志分析页面的来访ip的地址位置显示
这里我们用国内最准确的ip数据库——QQ纯真库我在博客附件里面放了这个工具,大家下载之后通过CRT用lrzsz工具传上去,具体步骤这里不写了。
附件里面有三个文件qqhostinfo.pm,qqwry.pl和QQWry.Dat,我们将这三个文件统统都放到/usr/local/awstats/wwwroot/cgi-bin/plugins中。
接下来,我们修改qqwry.pl文件,将./QQWry.Dat修改为${DIR}/plugins/QQWry
vim/usr/local/awstats/wwwroot/cgi-bin/plugins/qqwry.pl
#my$ipfile="./QQWry.Dat";
修改为:
my$ipfile="${DIR}/plugins/QQWry.Dat";
然后编辑awstats的配置文件/etc/awstats/awstats.www.sunsky.com.conf(根据你前面配置的站点信息生成的文件),将LoadPlugin="hostinfo"替换为LoadPlugin="qqhostinfo"即可。
sed-i's#\#LoadPlugin="hostinfo"#LoadPlugin="qqhostinfo"#g'/etc/awstats/awstats.www.sunsky.com.conf
切记,在这些替换完之后一定要查看替换是否成功,以便及早发生纰漏。
grep"LoadPlugin=\"qqhostinfo\""/etc/awstats/awstats.www.sunsky.com.conf
如果检查无误,那么我们的ip地址位置显示就配置好了,在后面的日志分析中,我们就可以清楚的看到来访ip的地理位置信息了。
五、配置nginx
接下来我们要配置nginx使其能安全的访问到分析的数据
vim/usr/local/nginx/conf/nginx.conf
在server{}内添加如下内容:
server{
listen80;
server_namewww.sunsky.com;
location/{
root/www/sunsky;
indexindex.htmlindex.htm;
access_log/app/logs/www_access.logmain;
}
location~*^/cgi-bin/.*\.pl${
root/usr/local/awstats/wwwroot;
fastcgi_passunix:/usr/local/nginx/fastcgi_temp/perl_cgi-dispatch.sock;
fastcgi_indexindex.pl;
includefastcgi_params;
charsetgb2312;
auth_basic"Restricted";#有些网站不愿意公开网站流量信息,所以加个认证
auth_basic_user_file/usr/local/nginx/htpasswd.pass;#该文件由apache的加密认证工具htpasswd创建
}
location~^/icon/{
root/usr/local/awstats/wwwroot/;
indexindex.html;
access_logoff;
error_logoff;
charsetgb2312;
}
}
为了保持nginx.conf主配置文件更加整洁干净,所以我们将fastcgi_param的一系列参数添加到/usr/local/nginx/conf/fastcgi_params文件的最顶部,然后在nginx.conf里面调用这个文件即可。
vi/usr/local/nginx/conf/fastcgi_params
fastcgi_paramSCRIPT_FILENAME$document_root$fastcgi_script_name;
fastcgi_paramQUERY_STRING$query_string;
fastcgi_paramREQUEST_METHOD$request_method;
fastcgi_paramCONTENT_TYPE$content_type;
fastcgi_paramCONTENT_LENGTH$content_length;
fastcgi_paramGATEWAY_INTERFACECGI/1.1;
fastcgi_paramSERVER_SOFTWAREnginx;
fastcgi_paramSCRIPT_NAME$fastcgi_script_name;
fastcgi_paramREQUEST_URI$request_uri;
fastcgi_paramDOCUMENT_URI$document_uri;
fastcgi_paramDOCUMENT_ROOT$document_root;
fastcgi_paramSERVER_PROTOCOL$server_protocol;
fastcgi_paramREMOTE_ADDR$remote_addr;
fastcgi_paramREMOTE_PORT$remote_port;
fastcgi_paramSERVER_ADDR$server_addr;
fastcgi_paramSERVER_PORT$server_port;
fastcgi_paramSERVER_NAME$server_name;
fastcgi_read_timeout60;
针对上面的加密,由于nginx没有好的加密认证工具,需要借助apache的htpasswd来实现加密认证功能:
htpasswd-c-m/usr/local/nginx/htpasswd.passsunskyadmin#用户名为sunskyadmin
配置完毕之后,检查nginx语法,然后优雅重启之后,用游览器访问http://www.sunsky.com/cgi-bin/awstats.pl?config=www.sunsky.com,输入账号密码之后即可查看统计信息了。

至此,awstats已经可以实现对Nginx的日志统计,动态化安全访问及来访ip的地址位置显示等功能了。
五、配置awstats自动运行
为了让整个日志的统计过程可以实现自动化,将awstats.sh脚本加入crontab定时任务中去,此时结合上面的定时切割任务,我们的crontab里面会有多出来两条定时任务。
10***/bin/sh/server/scripts/cut_nginx_log.sh>/dev/null2>&1
01***/bin/sh/server/scripts/awstats_up.sh>/dev/null2>&1
到此,我们整个日志访问工具awstats在nginx上对日志分析之后的静态化和动态化访问都已经实现了。后面的话,我会再写一篇awstats对apache服务器的日志分析部署文档。大家如果有什么问题的话,可以联系我进行交流探讨,咱们共同学习,共同进步!
本文作者:sunsky,博客地址:http://sunsky.blog.51cto.com/
原文链接:https://77isp.com/post/8768.html
=========================================
https://77isp.com/ 为 “云服务器技术网” 唯一官方服务平台,请勿相信其他任何渠道。
数据库技术 2022-03-28
网站技术 2022-11-26
网站技术 2023-01-07
网站技术 2022-11-17
Windows相关 2022-02-23
网站技术 2023-01-14
Windows相关 2022-02-16
Windows相关 2022-02-16
Linux相关 2022-02-27
数据库技术 2022-02-20
抠敌 2023年10月23日
嚼餐 2023年10月23日
男忌 2023年10月22日
瓮仆 2023年10月22日
簿偌 2023年10月22日
扫码二维码
获取最新动态
